How to Connect LinkedIn Leads with Sender CRM
Connecting Sender CRM with LinkedIn lead generation can help you automatically move new leads into your CRM instead of manually copying contact information from LinkedIn. With LeadsNotify, you can create an automation that sends leads from LinkedIn Lead Gen Forms directly to…

Table of contents
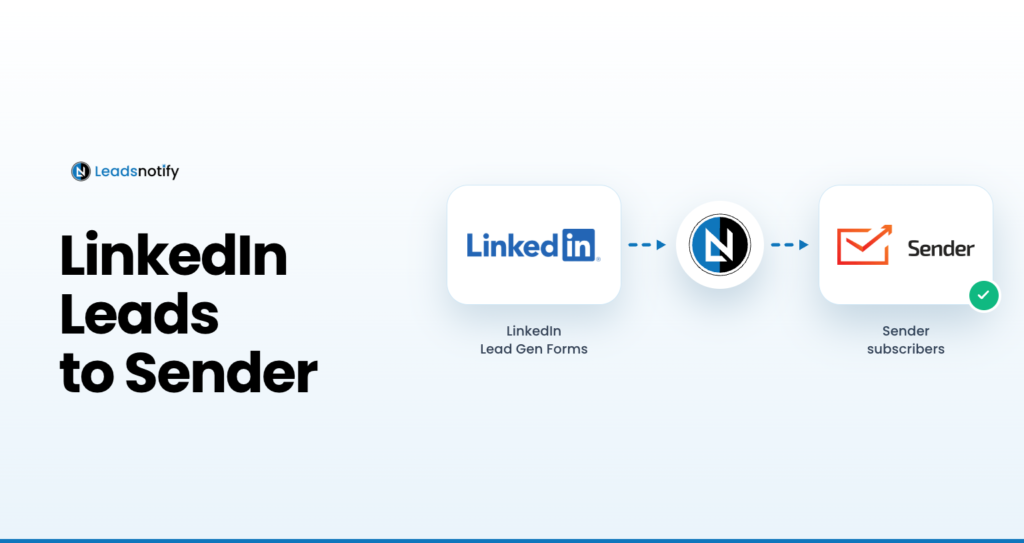
Connecting Sender CRM with LinkedIn lead generation can help you automatically move new leads into your CRM instead of manually copying contact information from LinkedIn. With LeadsNotify, you can create an automation that sends leads from LinkedIn Lead Gen Forms directly to Sender CRM.
This guide explains how to connect LinkedIn leads to Sender CRM using LeadsNotify, configure your LinkedIn lead form, add your Sender API key, select the destination group, and test the integration.
Automating this process can reduce manual data entry and help your sales team manage new LinkedIn contacts more efficiently.
What is Sender CRM?
Sender is a customer communication and marketing platform that provides tools for managing contacts, email campaigns, automation, and customer communication. Businesses can use Sender to organize contacts and communicate with leads collected through different marketing channels.
When you generate leads through LinkedIn Lead Gen Forms, connecting those leads to Sender can make it easier to keep new contacts organized and start your follow-up process quickly.
How to connect LinkedIn leads to Sender CRM
The setup requires three main parts: your LinkedIn lead source, your LeadsNotify account, and your Sender account. LeadsNotify acts as the connection between the LinkedIn lead form and Sender.
Step 1: Sign up and log in to LeadsNotify
First, sign up or log in to LeadsNotify.
After signing in, you can create a notifier that connects your LinkedIn lead source with Sender CRM.
Step 2: Connect your LinkedIn account
Next, connect your LinkedIn account to LeadsNotify.
If you need help setting up your lead source and notifications, see our guide on how to set up lead notifications.
Once LinkedIn is connected, LeadsNotify can use the available lead forms that you want to connect with your Sender workflow.
Step 3: Create a Sender CRM notifier
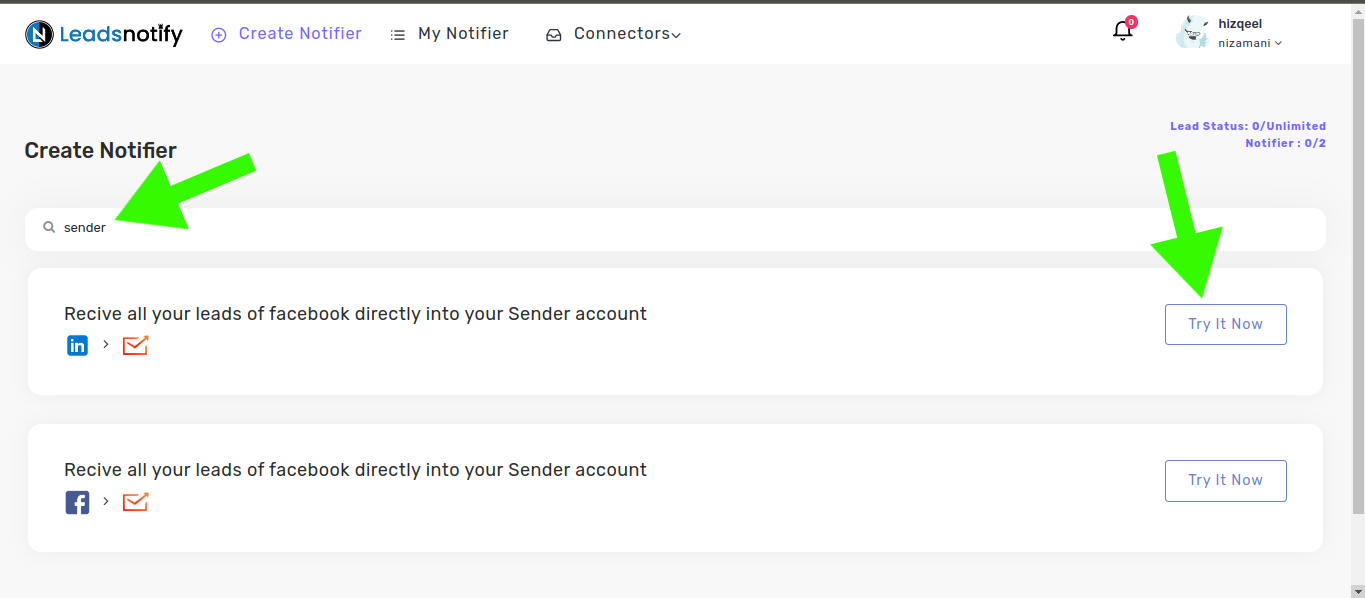
After connecting LinkedIn, navigate to the Create Notifier option in LeadsNotify.
Search for Sender and click Try Now. LeadsNotify will then guide you through the configuration process.
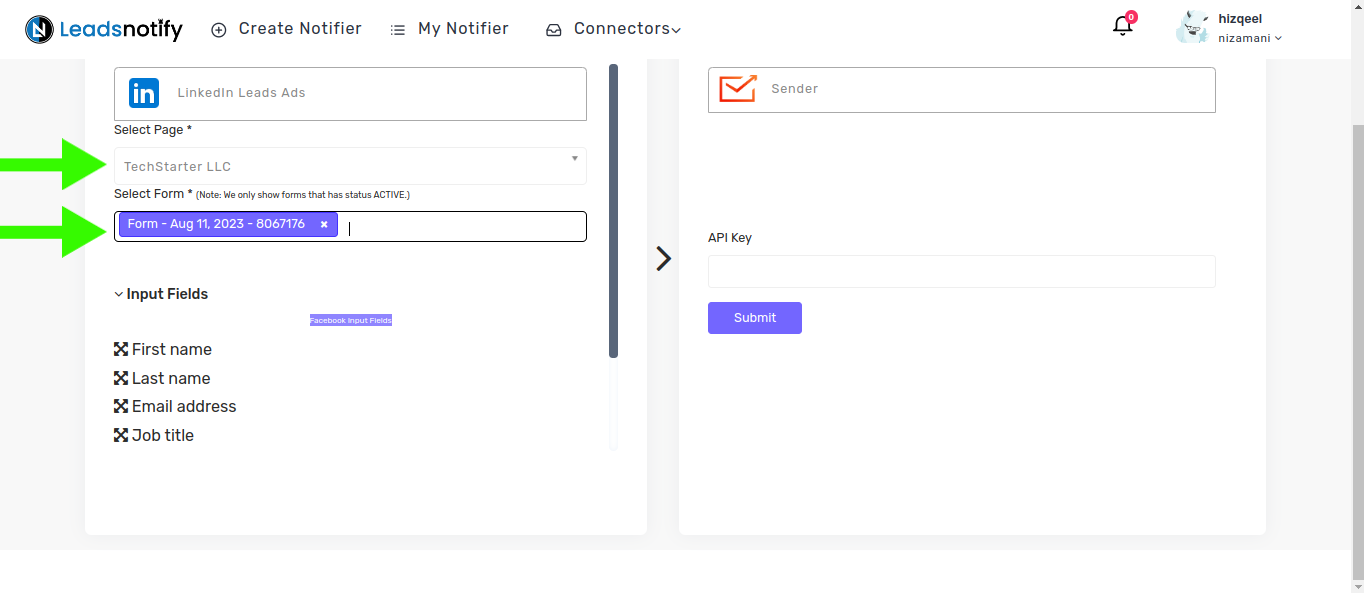
After clicking Try Now, you will see the notifier configuration options. The first section allows you to select your LinkedIn page and the lead forms you want to connect.
Once you select the appropriate instant form, LeadsNotify will display the available fields from that form.
Step 4: Get your Sender API key
In the right-hand box, you will need to enter your Sender API key. This key allows LeadsNotify to connect to your Sender account and send the leads to the selected destination.
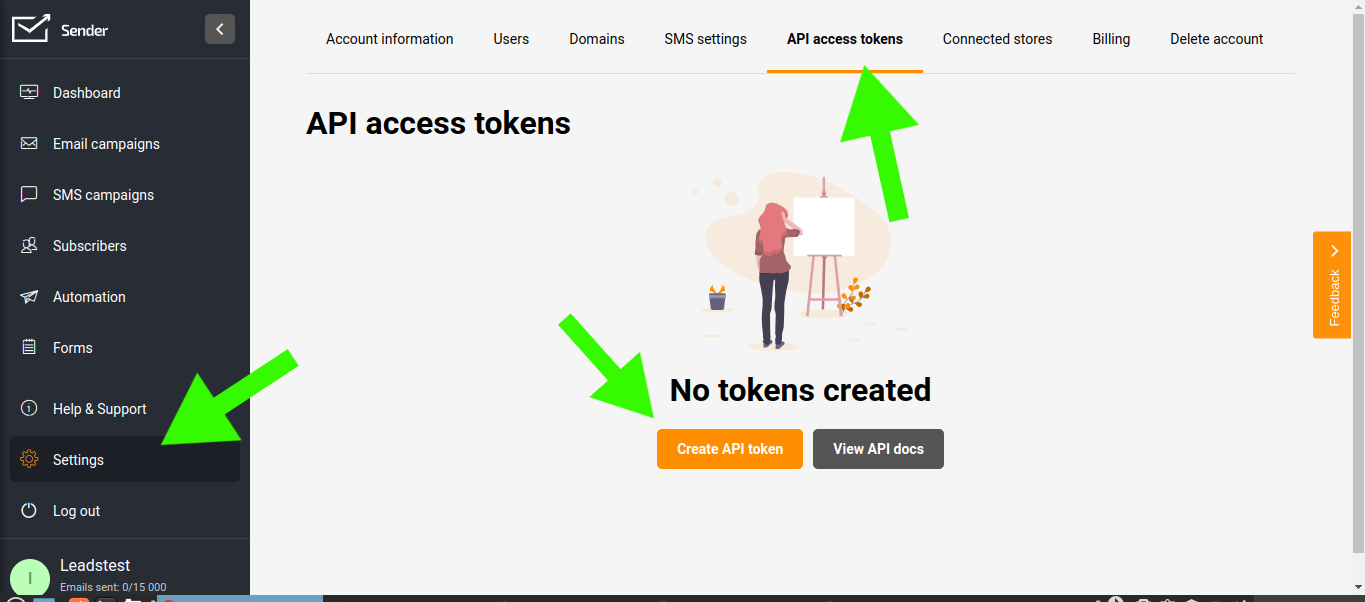
To find your API key, log in to your Sender account, open Settings, go to API Access Token, and select Create API Token.
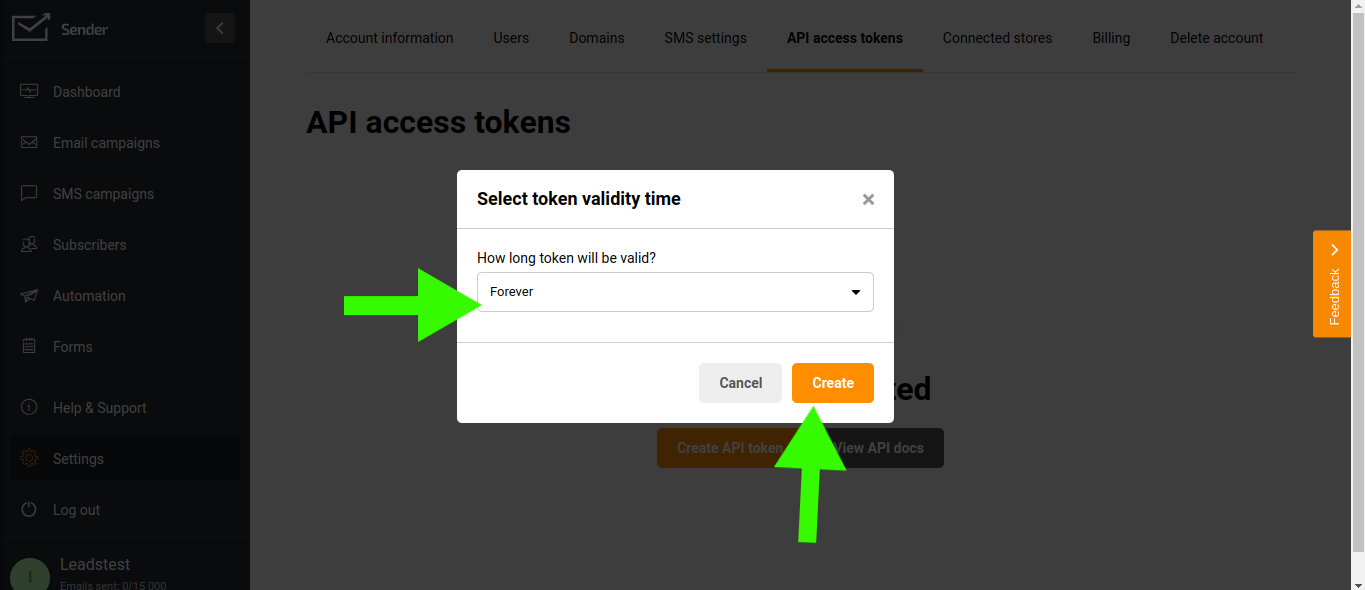
Set the token as needed and click Create.
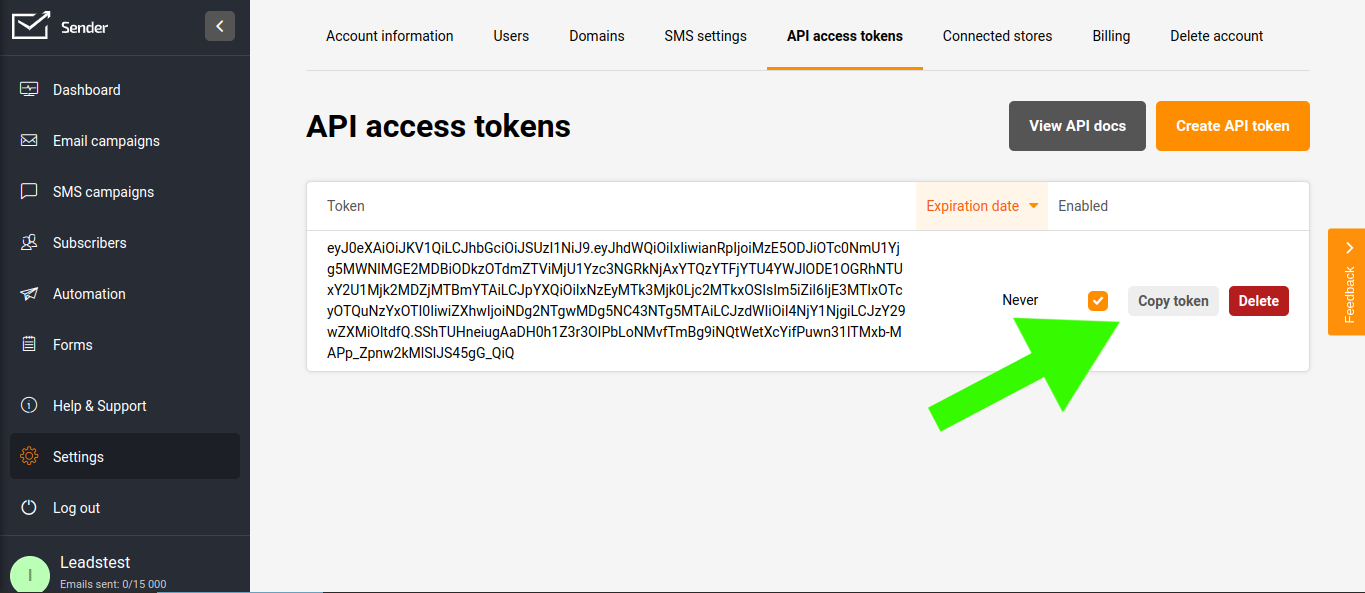
Once the token has been created, copy the API key.
Step 5: Add the Sender API key to LeadsNotify
Return to LeadsNotify and paste the copied API key into the API KEY field. Then click Submit.
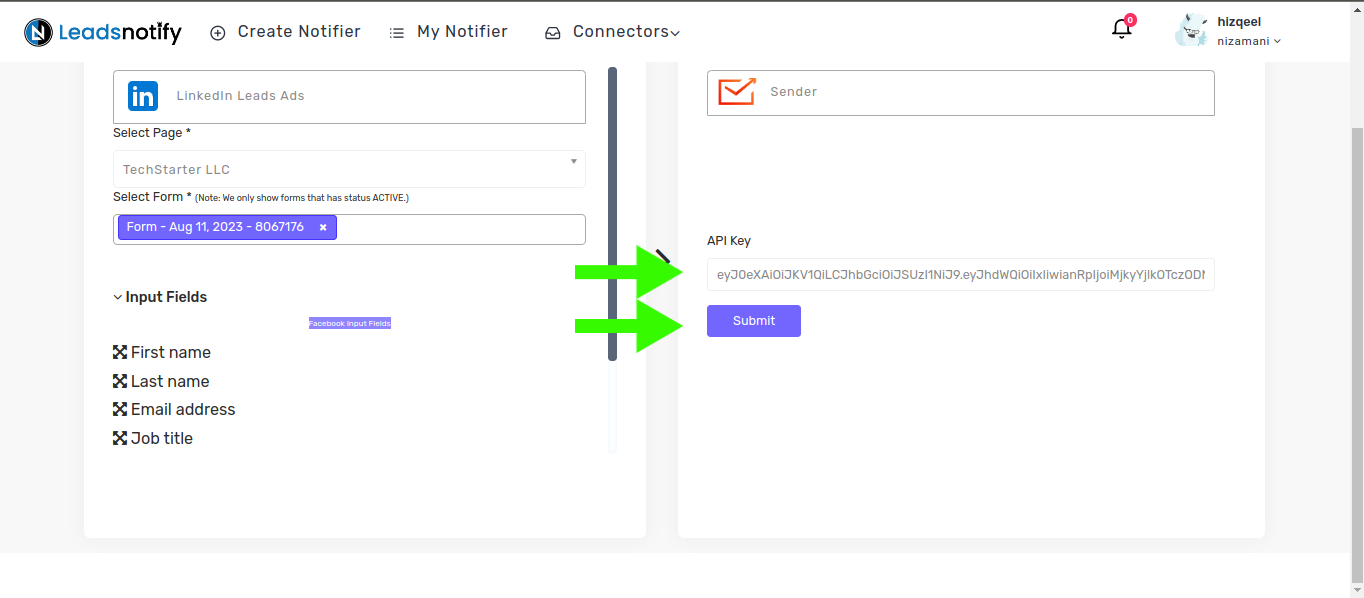
After the API key is accepted, you will see a dropdown containing your available Sender groups and related fields.
Select the group where you want to receive your LinkedIn leads and click Submit.
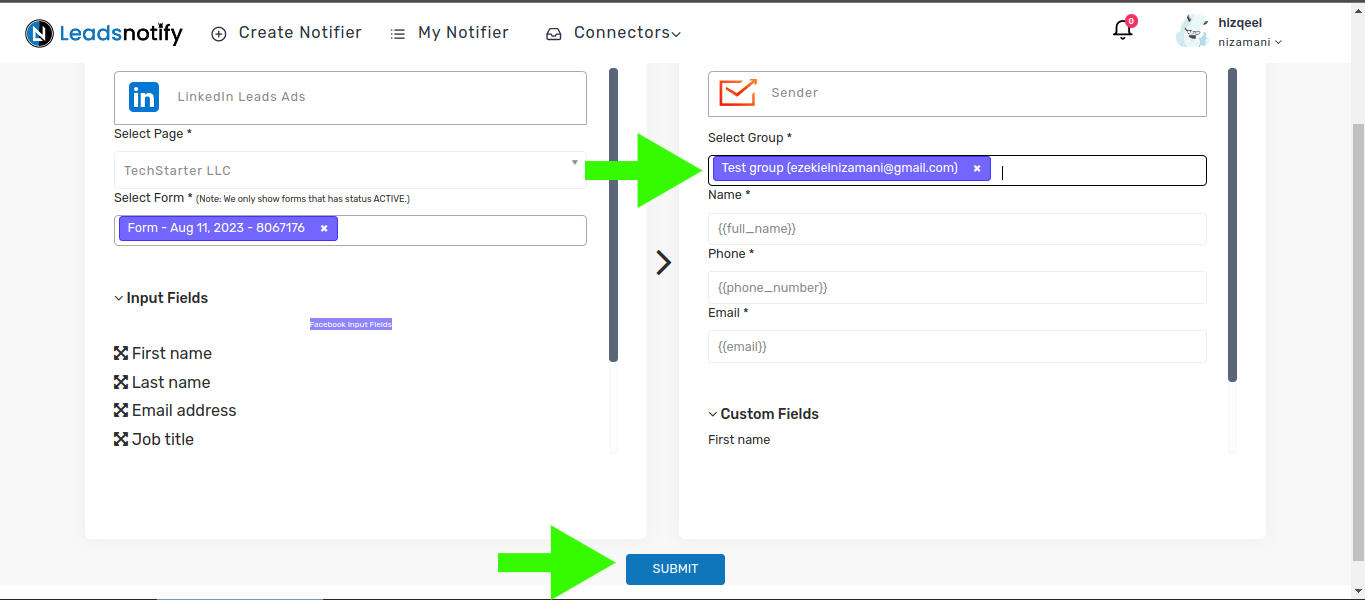
How the LinkedIn leads to Sender CRM automation works
Once the notifier is configured, the workflow is straightforward:
- A prospect submits a LinkedIn Lead Gen Form.
- LeadsNotify receives the new lead.
- LeadsNotify processes the lead through your configured notifier.
- The lead information is sent to your selected Sender group.
- Your team can then manage and follow up with the new contact in Sender.
This workflow can save time by reducing the need to manually download, copy, or import every LinkedIn lead into your CRM or contact-management system.
What about the LinkedIn Leads API?
If you are researching the LinkedIn Leads API or ways to connect LinkedIn lead data with another system, the important part is understanding how the lead data moves from the LinkedIn lead form to your destination.
Instead of building and maintaining a custom integration yourself, LeadsNotify provides a ready-to-configure workflow for supported lead sources and destinations. This can be useful when your goal is to move LinkedIn leads into a contact-management or marketing platform such as Sender.
For teams using multiple CRM or marketing systems, the same type of automated workflow can also be used for other integrations. For example, you can learn more about connecting LinkedIn leads with Capsule CRM.
How to test the Sender CRM LinkedIn integration
After creating the automation, it is important to test the workflow before relying on it for live LinkedIn campaigns.
A test confirms that your LinkedIn lead form is connected correctly and that LeadsNotify can deliver the lead to your selected Sender group.
Step 1: Open LinkedIn Campaign Manager
- Log in and open LinkedIn Campaign Manager.
- Navigate to the Advertise section.
- Select the relevant Campaign Group.
- Select the appropriate Campaign.
- Click the relevant Ad Name.
This will open the ad and its associated lead form. In the original example, the campaign uses a subscriber form to collect lead information.
For testing purposes, the form contains a Subscribe button that allows you to submit the test lead.
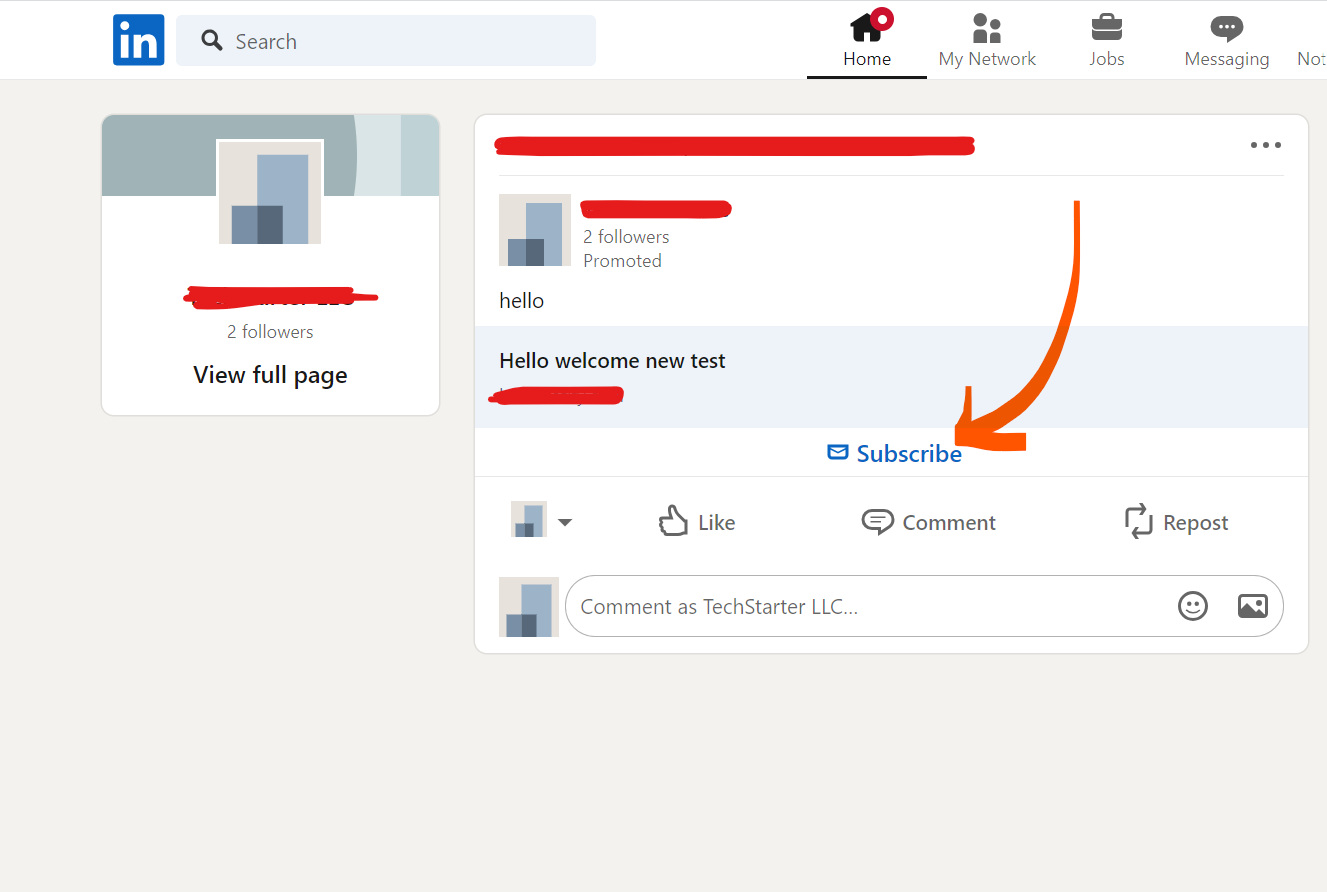
Click the button to open the form. You will then see the fields required to submit the lead, such as the name and email address shown in the example below.
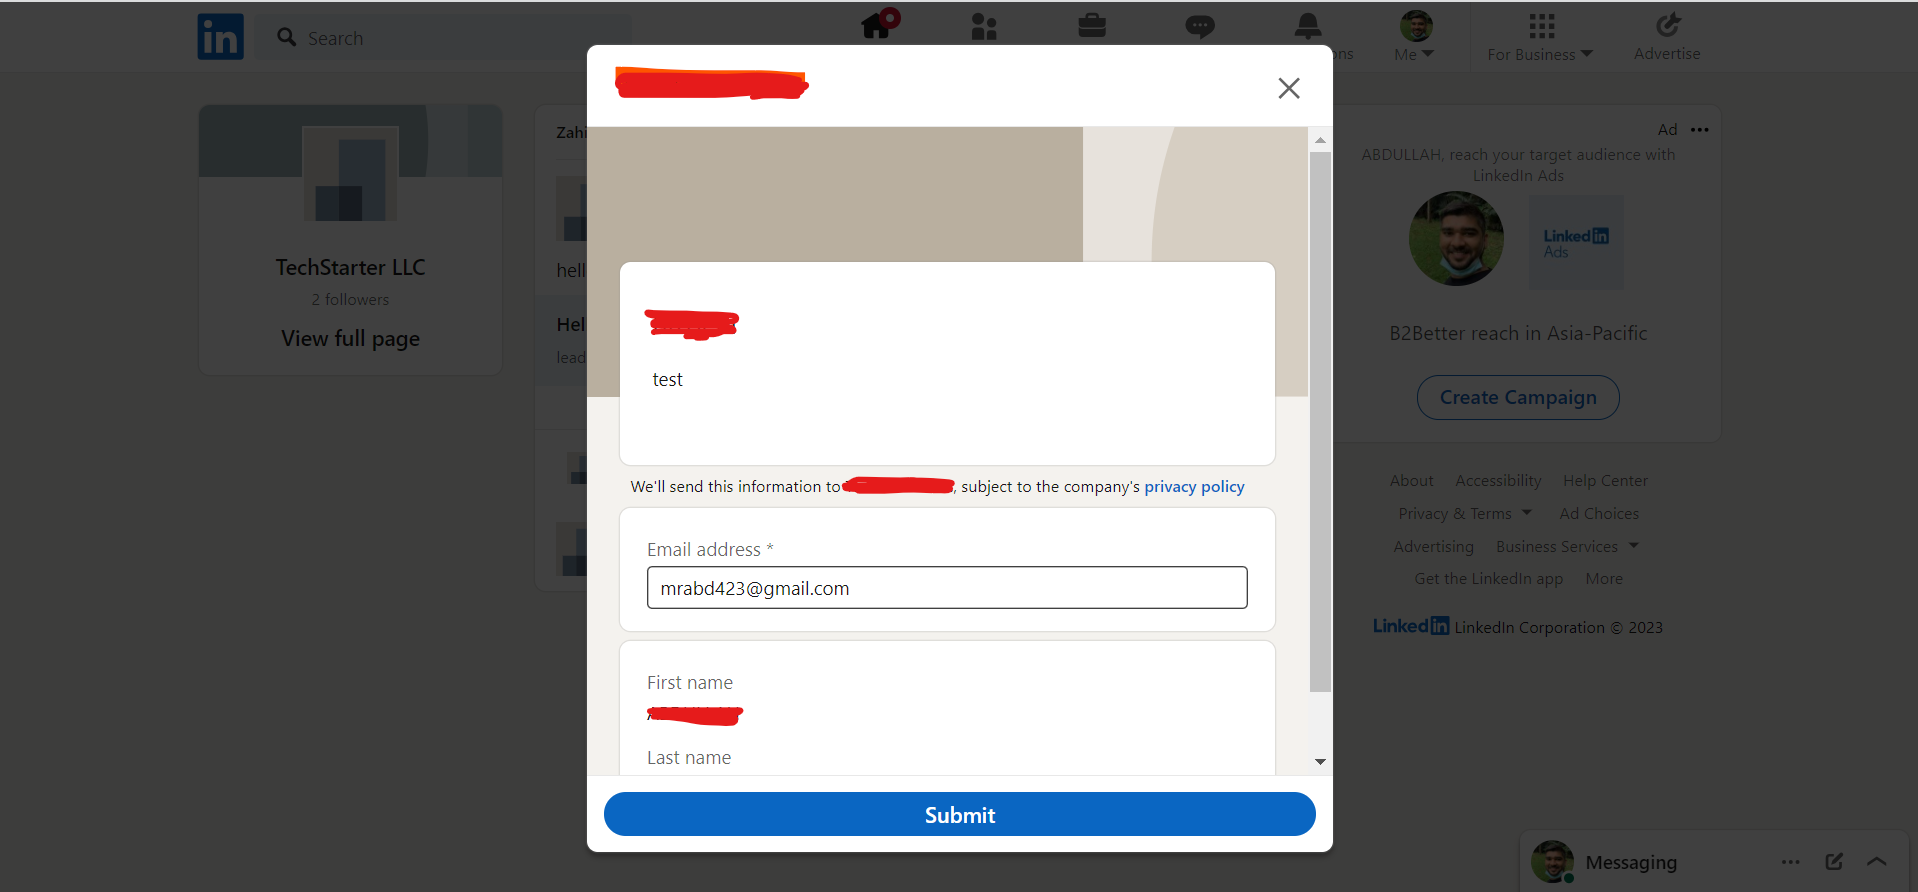
Step 2: Submit the test lead
Submit the LinkedIn form using your test information. LeadsNotify should receive the lead and send it through the notifier you created for Sender.
Step 3: Check Sender
After submitting the test form, open your Sender account and check the group you selected during the notifier setup.
If the contact appears in the selected Sender group, your LinkedIn to Sender CRM integration is working as expected.
If the lead does not appear, review the LinkedIn connection, API key, selected lead form, and Sender destination group. You can also contact support@leadsnotify.com for assistance.
LinkedIn contact management with Sender
Automatically sending LinkedIn leads to Sender is only the first step. Once a new contact reaches Sender, your team can continue managing and communicating with that contact from the platform.
This can be especially useful for businesses running LinkedIn marketing campaigns where multiple prospects submit lead forms. Instead of manually transferring each contact, the new leads can be routed into the appropriate Sender group automatically.
Best practices for a LinkedIn and Sender CRM workflow
- Test the integration first: Submit a test lead and confirm that it appears in the correct Sender group.
- Check your LinkedIn lead form: Make sure the form you select in LeadsNotify is the form connected to your active campaign.
- Keep your API key secure: Treat your Sender API key as a private credential and do not share it publicly.
- Choose the correct Sender group: Select the group where your sales or marketing team expects to receive new LinkedIn contacts.
- Monitor lead delivery: If a lead does not appear in Sender, check the integration and delivery status before assuming the automation has failed.
- Keep your contact workflow organized: Use consistent groups and follow-up processes so your team can act on new leads quickly.
Frequently asked questions
Can I connect LinkedIn leads to Sender CRM?
Yes. LeadsNotify can be used to create an automation that receives leads from supported LinkedIn lead forms and sends them to a selected Sender group.
How does the Sender CRM LinkedIn integration work?
The workflow connects your LinkedIn lead source to LeadsNotify and then configures Sender as the destination. When a prospect submits a connected LinkedIn Lead Gen Form, LeadsNotify processes the lead and sends it to the selected Sender group.
Do I need a Sender API key?
Yes. The setup shown in this guide uses a Sender API key to authorize the connection between LeadsNotify and your Sender account.
Can I choose where LinkedIn leads are sent in Sender?
Yes. During the notifier configuration, you can select the Sender group where you want the LinkedIn leads to be received.
Can I test the LinkedIn to Sender connection?
Yes. You can submit a test lead through your LinkedIn Lead Gen Form and then check the selected Sender group to confirm that the contact was delivered successfully.
What should I do if a LinkedIn lead does not appear in Sender?
First, check that your LinkedIn account and lead form are connected correctly. Then verify the Sender API key and make sure the correct Sender group was selected. You should also review the delivery status in LeadsNotify.
Do I have to manually copy LinkedIn leads into Sender?
No. With a properly configured LeadsNotify notifier, supported LinkedIn lead forms can be connected to Sender so new leads are transferred automatically instead of being copied manually.
Automate LinkedIn leads with Sender CRM
Manually moving LinkedIn leads into your contact-management or marketing platform can take time and create unnecessary data-entry work. Connecting LinkedIn with Sender through LeadsNotify gives you a more automated way to move new leads into the group where your team can manage them.
The setup requires you to connect your LinkedIn lead source, select Sender in LeadsNotify, add your Sender API key, choose the destination group, and test the workflow.
If your business relies on LinkedIn lead generation, automating the transfer to Sender can help your team spend less time moving contact data and more time following up with potential customers.
Ready to connect your LinkedIn leads with Sender CRM? Sign up for LeadsNotify and create a Sender notifier to get started.
Set up a free notification in a few minutes.

Hizqeel Nizamani
Hizqeel Nizamani is a software engineer and backend developer working on CRM integrations, automation, APIs, and lead management systems. At LeadsNotify, he helps build and improve technology that enables businesses to capture, manage, and respond to leads more effectively.
Connect on LinkedIn ↗