

How to Auto-Reply to Facebook Lead Ads With an Email Autoresponder
Send every new Facebook lead an instant email from your own address. Set up the LeadsNotify Email Autoresponder with SMTP in about 5 minutes.
 By Akash Mehra
6 min read
By Akash Mehra
6 min read
Table of contents
Someone fills in your Facebook lead form. What happens next decides whether they pick up when you call. If the next thing they see is a friendly email from your own address, with their name in it, they know a real business received their request.
The LeadsNotify Email Autoresponder sends that email automatically. It connects to your mailbox over SMTP and sends each new Facebook lead a reply the moment the form is submitted. This guide shows you how to set it up in about five minutes.
Why Send an Instant Reply to New Leads?
- It confirms the request. The lead knows their details arrived and what happens next.
- It comes from you. The email is sent from your own mailbox, so replies land in your inbox, not a no-reply address.
- It sets up the call. Tell the lead who will contact them and when, so they recognise the number.
- It works at 11pm. Leads that arrive outside office hours still hear from you in seconds.
How to Set Up the Facebook Lead Ads Email Autoresponder
Before you start, you need: a LeadsNotify account, admin access to the Facebook Page that runs your instant forms, and the SMTP details of the mailbox you want to send from.
Step 1: Connect Your Facebook Page
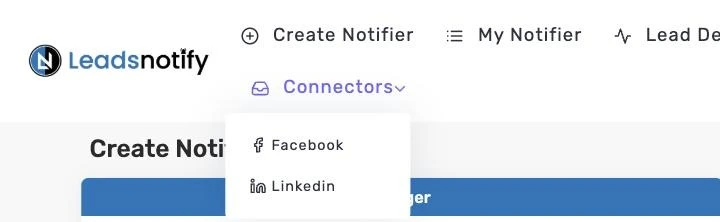
Log in to LeadsNotify. Open Connectors in the top menu and choose Facebook. Click Connect To Facebook, tick the Pages that own your lead forms, and approve the permissions Facebook asks for.
Every Page you ticked shows as CONNECTED. Managing a client’s Page? The client has to give your business admin access and leads access first, otherwise the Page won’t appear in the Facebook popup. Already connected your Page for another notifier? Skip to step 2.
Step 2: Create an Email Autoresponder Notifier
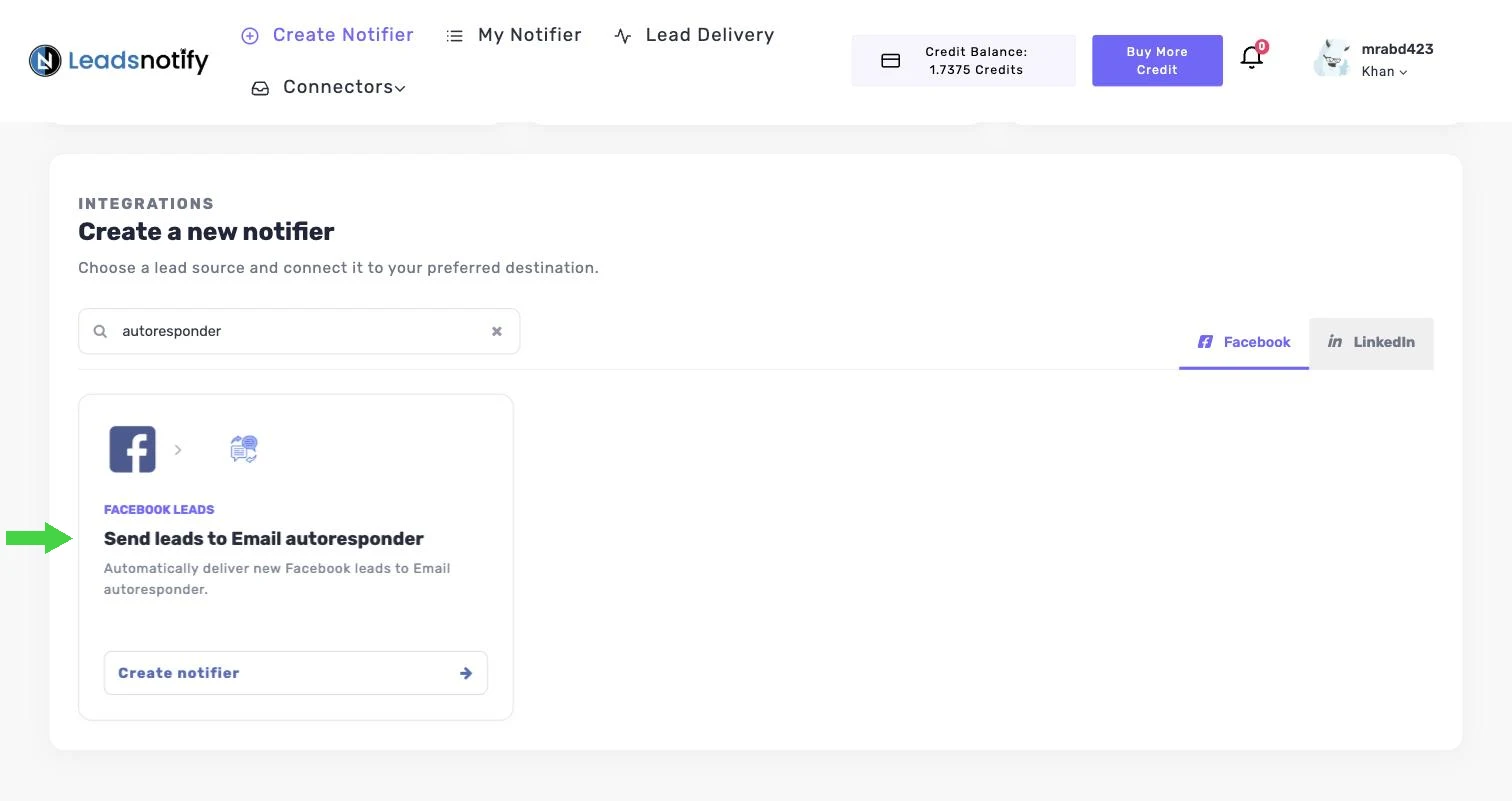
Go back to the dashboard. Under Create a new notifier, make sure the Facebook tab is selected, type “autoresponder” in the search box, find Send leads to Email autoresponder and click Create notifier.
Step 3: Pick Your Page and Instant Forms
The Create Notifier screen has two sides. The Trigger on the left is where leads come from. The Action on the right is where they go.
In the Trigger panel, choose your Page under Select Facebook Page, then pick one or more forms under Select Form. LeadsNotify lists the fields on those forms under Input Fields.
Only active forms are shown. Facebook doesn’t let you edit a published instant form, so if you changed a question you duplicated the form. Pick the copy your ad is actually running. New to lead forms? Here’s how to set up a Facebook instant form.
Step 4: Enter Your SMTP Details
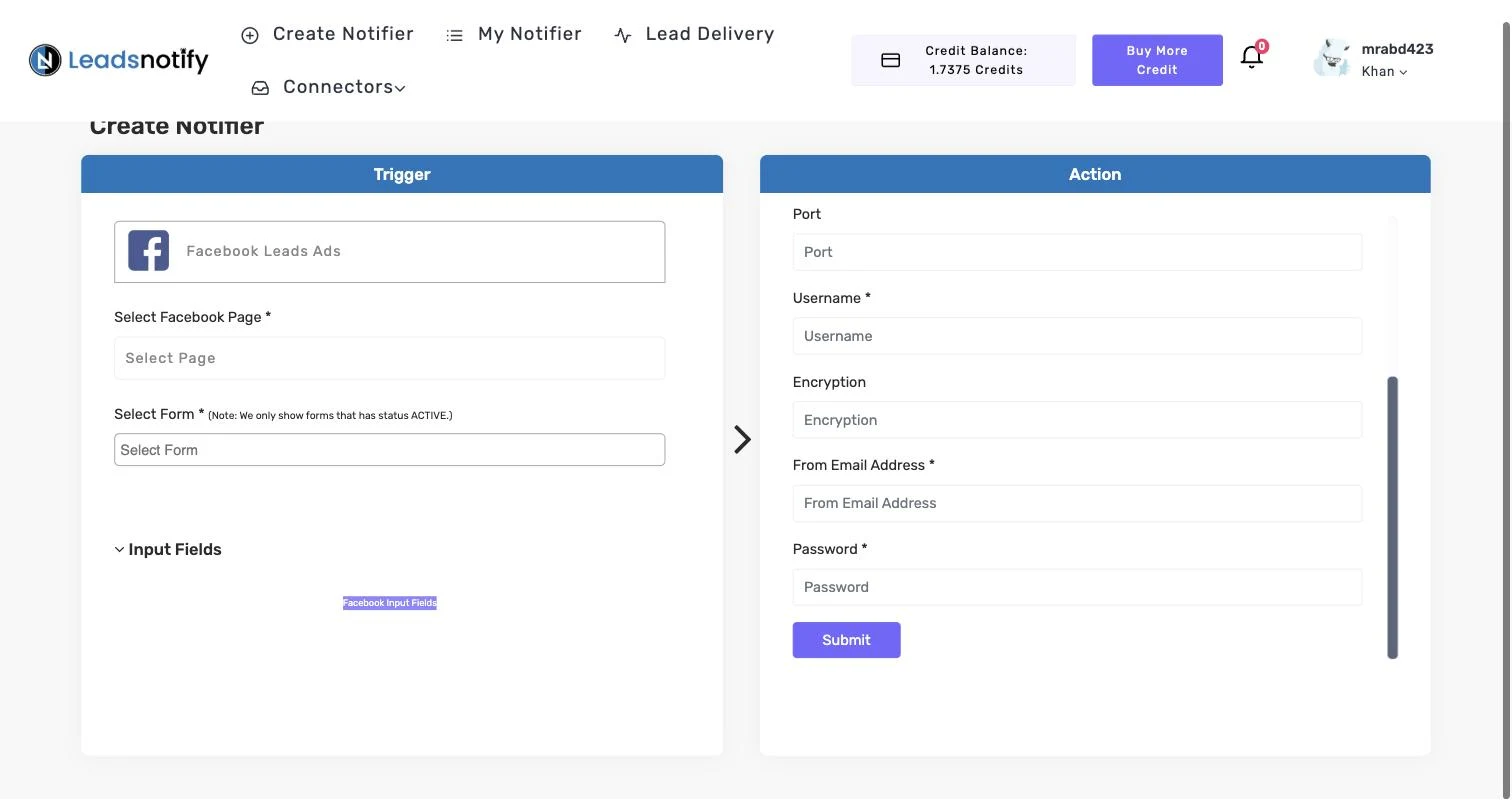
The Action panel asks for the details LeadsNotify needs to send email from your mailbox:
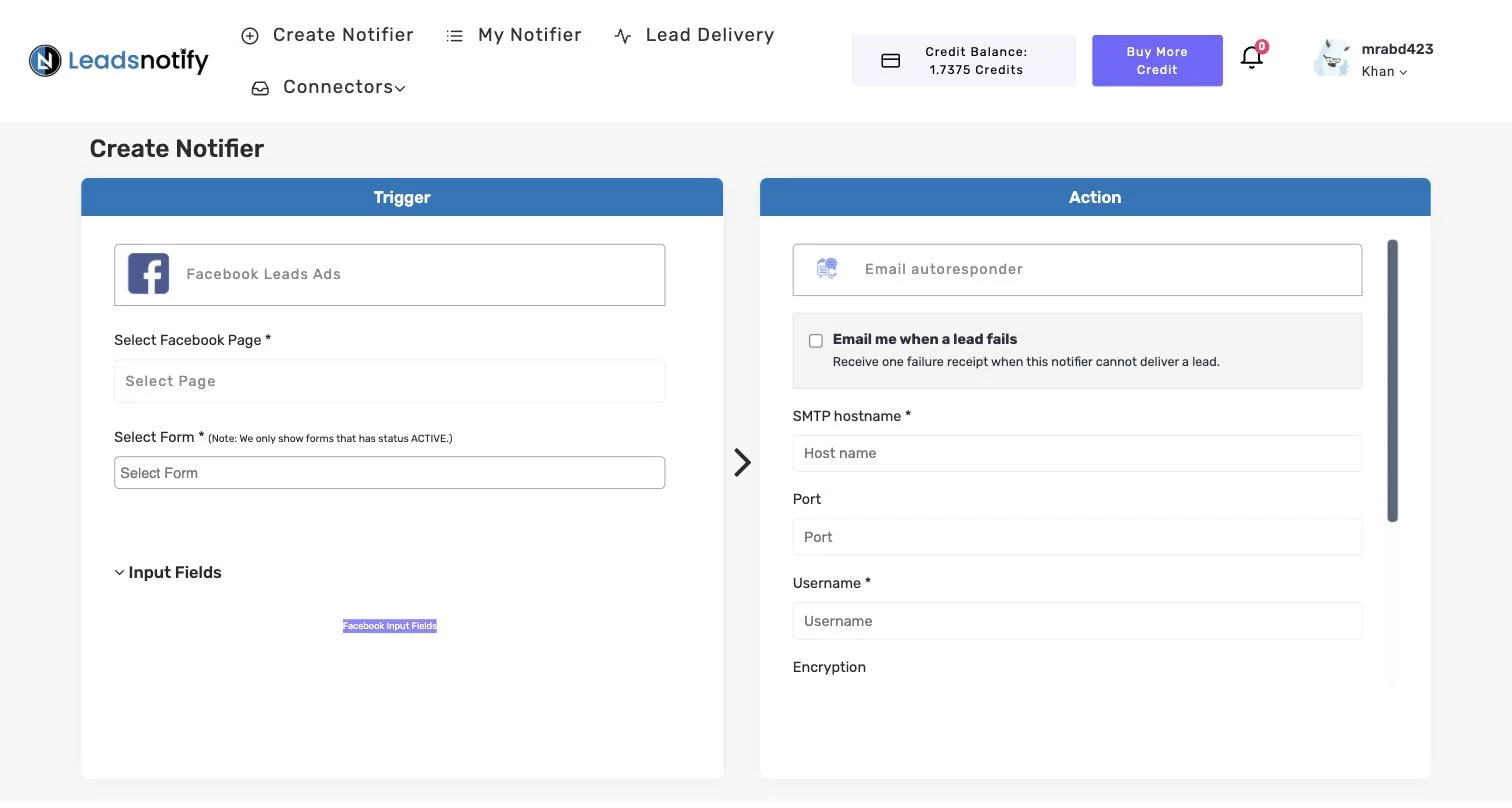
- SMTP hostname: your provider’s outgoing mail server.
- Port: usually 587.
- Username: normally your full email address.
- Encryption: TLS for port 587, SSL for port 465.
- From Email Address: the address the lead sees the email come from.
- Password: your mailbox password or, for Google, an App Password.
Common settings:
| Provider | SMTP hostname | Port / encryption | Password |
|---|---|---|---|
| Gmail and Google Workspace | smtp.gmail.com | 587 / TLS (or 465 / SSL) | An App Password, which needs 2-Step Verification turned on |
| Microsoft 365 and Outlook | smtp.office365.com | 587 / TLS (STARTTLS) | Your mailbox password. SMTP AUTH must be enabled for the mailbox |
| Other providers | See your provider’s SMTP settings page | Usually 587 / TLS | Your mailbox password or an app password |
Click Submit. LeadsNotify checks it can sign in to your mailbox before you continue.
Step 5: Write the Email
Fill in the email details: To (the lead’s email field), optional Cc and Bcc, a From Name and a Subject. Then click Create Email Template and write the message.
The template editor lists the lead fields you can use as placeholders, so each email can greet the lead by name and mention what they asked about. Keep it short: thank them, say what happens next and who will contact them, and sign it with a real name.
Add yourself in Bcc if you want a copy of every reply. Tick Email me when a lead fails, then save the notifier. It appears under My Notifier with a green switch when it’s live.
Step 6: Send a Test Lead
After you submit the notifier, LeadsNotify offers to send a test lead through it. You can also do this later: open My Notifier, click Edit on the notifier, then click TEST NOTIFIER.
Check the inbox of the email address you used on the test lead. If the test lead is there with the right details, the notifier is working.
Want to test with a real form submission from Facebook? Use Meta’s Lead Ads Testing Tool, pick your Page and form, and submit a test lead. Use a real email address you own, because some tools reject placeholder addresses.
Then open Lead Delivery in LeadsNotify. Every attempt is listed with the Page, the form, the destination and a status of Delivered or Failed, and the Response column shows the exact reply from your mail server. Our guide to the lead delivery status dashboard walks through every column.

A Simple Autoresponder Template
Subject: Thanks, {first name}. We got your request
Hi {first name}, thanks for getting in touch about {your offer}. One of our team will call you within one working day from {your number}. If there is a better time to reach you, just reply to this email. {Your name}, {Company}
Replace the parts in curly brackets with placeholders from the template editor and your own details.
Troubleshooting the Email Autoresponder
| What you see | Likely cause | Fix |
|---|---|---|
| No leads arriving at all | The Facebook Page shows DISCONNECTED, often after an admin leaves or a role changes | Connectors > Facebook > Connect To Facebook, and tick the Page again |
| Leads stopped after you changed the form | Your ad now runs a duplicated form and the notifier still watches the old one | Edit the notifier in My Notifier and select the new form |
| Your form isn’t in the list | Only active forms are shown | Check the form’s status in Meta, then reopen the notifier |
| Submit fails for the SMTP details | Wrong hostname, port or encryption, or the password was refused | Check the settings table above. For Gmail use an App Password, not your normal password |
| Microsoft 365 refuses to sign in | SMTP AUTH is turned off for the mailbox | Ask your Microsoft 365 admin to enable authenticated SMTP for that mailbox |
| Emails land in spam | The From address and the mailbox do not match, or the domain has no SPF/DKIM | Send from the same address you sign in with, and check your domain’s email authentication |
| A delivery shows Failed | your mail server refused the lead | Open Lead Delivery and read the Response column for the reason |
Frequently Asked Questions
Does the email come from my own address?
Yes. LeadsNotify signs in to your mailbox over SMTP, so the email is sent from your address and replies come back to you.
Can I use Gmail?
Yes. Use smtp.gmail.com, port 587 with TLS, your full Gmail address as the username, and an App Password. Google limits how many emails an account can send per day, which is plenty for lead replies.
Can I personalise the email?
Yes. The template editor lists the lead’s form fields as placeholders, such as first name, so every email is addressed to the person who filled in the form.
Can I get a copy of each email?
Yes. Add your own address in Bcc.
Can I send the lead to my CRM as well?
Yes. Create a second notifier on the same form. See every Facebook Lead Ads integration option on our integrations page.
Which LeadsNotify plans include it?
Every plan, the free plan included. The free plan covers 150 leads a month and 2 notifiers. Compare the plans.
Reply to Every Lead in Seconds
Connect your Facebook Page, enter your SMTP details, write one short email and switch it on. Every new lead hears from you before they close the tab. Create your free LeadsNotify account and set up your autoresponder today.
Last Updated on September 25, 2026 by Akash Mehra
Set up a free notification in a few minutes.