Facebook Instant Form: How to Create One Step by Step
Facebook Instant Forms make it easy to collect leads directly from Facebook and Instagram ads without sending people to a separate landing page. Because the form opens inside Meta's platform and can use information users have already provided, it can reduce friction…

Table of contents
Facebook Instant Forms make it easy to collect leads directly from Facebook and Instagram ads without sending people to a separate landing page. Because the form opens inside Meta’s platform and can use information users have already provided, it can reduce friction and make lead capture easier.
In this guide, we’ll explain how to create an Instant Form on Facebook, choose the right form type, add questions, configure your privacy policy and completion screen, test the form, and publish it. We’ll also cover best practices for creating Facebook lead forms that are easier for prospects to complete and easier for your business to manage.
If you’re using Facebook Lead Ads to generate prospects, you can also connect your incoming leads to your CRM or marketing tools with LeadsNotify so new submissions can be delivered automatically instead of being handled manually.
What are Facebook Instant Forms?
Facebook Instant Forms, also known as Meta Instant Forms, are lead capture forms that open directly from Facebook or Instagram ads. Instead of requiring someone to visit an external website, the form allows them to submit their information within the Meta platform.
Instant Forms can use information already associated with a person’s Meta account, such as their name, email address, or phone number. This can make the submission process faster and reduce the number of fields a person has to type manually.
Why use Facebook Instant Forms for lead generation?
Facebook Instant Forms are useful when your primary goal is to capture contact information from people who interact with your ads. Because the form is designed to work within Facebook and Instagram, prospects do not necessarily need to leave the platform to become a lead.
- Reduce friction: Prospects can submit their information without visiting a separate landing page.
- Use pre-filled information: Some contact details can be populated automatically for the user.
- Capture qualified information: You can add custom questions to learn more about potential customers.
- Support lead-generation campaigns: Instant Forms work with Meta’s lead-generation advertising workflow.
- Connect leads to other tools: Leads can be transferred to supported CRM and marketing systems for follow-up.
How to create an Instant Form on Facebook
Creating a Facebook Instant Form involves setting up a lead-generation campaign, choosing your form type, adding the information you want to collect, configuring the privacy and completion sections, and testing the form before using it with live traffic.
Step 1: Open Facebook Ads Manager and create a lead campaign
First, log in to your Meta Business account and open Ads Manager.
- Click Create to start a new campaign.
- Choose Leads as the campaign objective.
- Continue through the campaign setup until you reach the lead-generation settings.
- Select the option to use an Instant Form as your lead capture method.
Depending on the version of Meta Ads Manager you are using, the exact menu names and locations may differ slightly. You may also find Instant Forms through the lead forms or publishing tools available in your Meta business account.
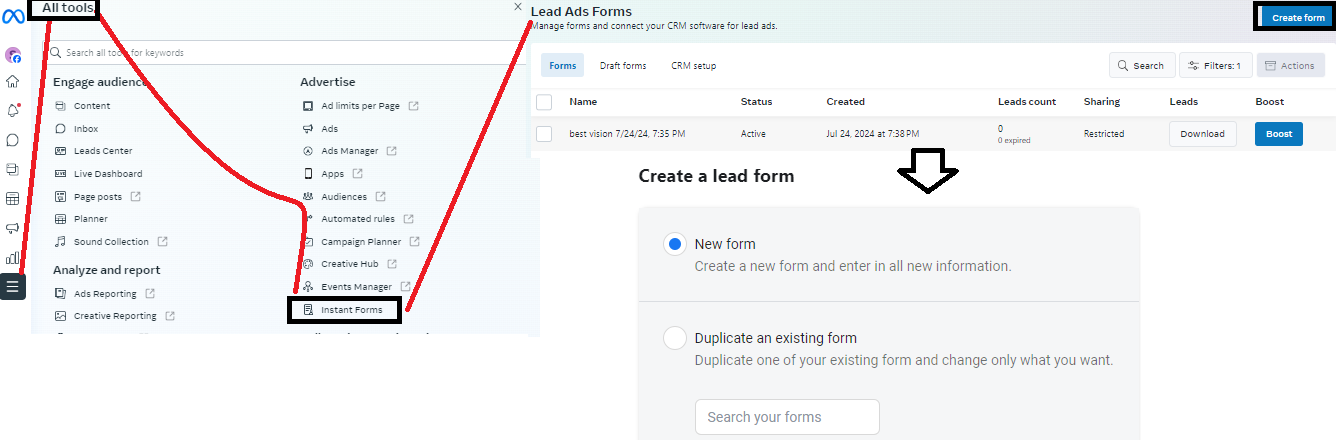
Another route in some Meta accounts is to open the available business tools and locate Instant Forms. From there, you can create a new form or work with an existing form.
Step 2: Name your Facebook Instant Form
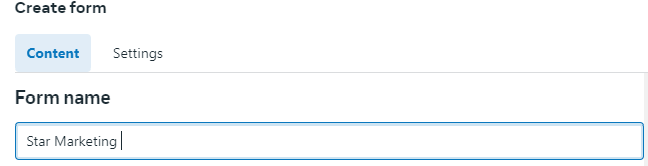
Give your form a clear name that makes it easy to identify later. The internal form name is for your own organization and is not the main message shown to people completing the form.
A descriptive naming system can be useful if you create multiple forms. For example, you could include the campaign, offer, or audience in the form name.
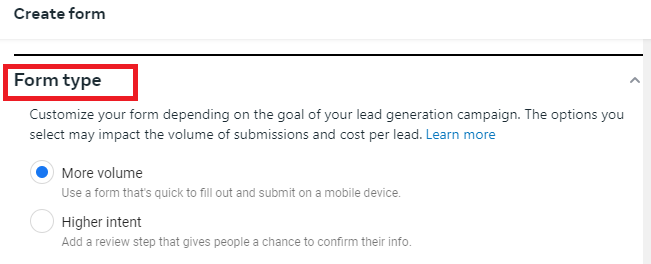
Step 3: Choose the Instant Form type
Meta may give you different options for how the form experience should work. Two common options are More Volume and Higher Intent.
- More Volume: Designed to make the submission process quicker and easier.
- Higher Intent: Adds an additional review step so people can check their information before submitting.
The best choice depends on your campaign. If your priority is maximizing the number of submissions, a lower-friction form may be appropriate. If lead quality is more important than submission volume, the additional review step can help prospects confirm their details before submitting.
Step 4: Add an introduction to your Facebook form
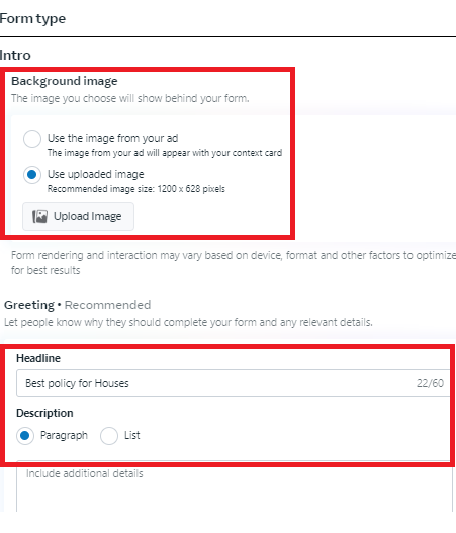
The introduction is the first part of the Instant Form that prospects see. Use it to explain what you’re offering and why someone should provide their information.
- Background image: Use an image that matches your advertising creative. A commonly used Facebook Instant Form background image size is 1200 × 628 pixels.
- Headline: Use a short, clear headline that communicates the value of completing the form.
- Description: Explain what the prospect will receive or what will happen after they submit their information.
Keep the introduction consistent with the ad that brought the person to the form. If the ad promises a free guide, consultation, quote, or offer, make that same benefit clear in the form.
Step 5: Add questions to your Facebook lead form
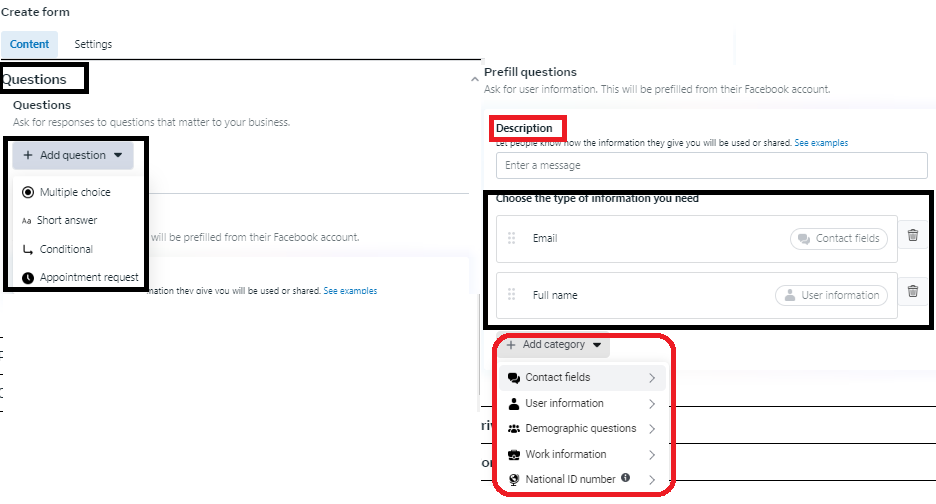
The questions section determines what information you collect from people who submit the form. Start with the information your sales or marketing team actually needs.
Depending on your campaign, you can use different question formats, including:
- Contact information
- Multiple-choice questions
- Short-answer questions
- Custom qualifying questions
- Conditional questions where available
Try to keep the form focused. Asking for unnecessary information can create additional friction and may reduce the number of people who complete the form.
Meta can also pre-fill certain contact details for eligible users, such as their name, email address, and phone number. Review the fields carefully and only request information that is useful for your follow-up process.
Step 6: Add your privacy policy
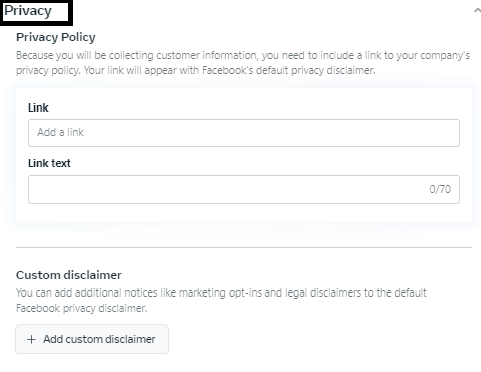
Your Facebook lead form should include the appropriate privacy information for your business and the data you are collecting. Add a link to your business’s privacy policy where required during form setup.
A clear privacy policy helps explain how submitted information will be handled and gives prospects more confidence when providing their contact details.
Make sure your data collection and follow-up practices comply with the privacy laws and requirements that apply to your business and audience.
Step 7: Set up the completion screen
After someone submits your Facebook lead form, the completion screen tells them what happens next. Use this section to thank the person and provide a clear next step.
- Thank the prospect for submitting the form.
- Explain when and how you will follow up.
- Provide instructions for accessing an offer, guide, or resource if applicable.
- Add a relevant call-to-action when available.
A useful completion screen prevents the lead from wondering what happens after submitting their information.

Step 8: Test your Facebook Instant Form
Before launching your campaign, test the form from the user’s perspective. Complete the form yourself and check that all fields, questions, links, and the completion experience work as expected.
Testing can help you catch problems before real prospects start submitting their information. It is also a good opportunity to confirm that the information you receive is useful to your sales or marketing team.
Step 9: Publish your Facebook Instant Form
Once you have reviewed and tested the form, publish it according to the options available in your Meta account.
Review the form carefully before publishing. Depending on the current Meta interface and form type, some settings may not be editable after publication. If you expect to run multiple campaigns, use clear names so your forms are easy to identify and manage.
Step 10: Monitor your Facebook lead form
After your campaign starts generating submissions, monitor the number and quality of leads rather than focusing only on form completion volume.
- Review how many leads your campaign generates.
- Monitor cost per lead.
- Check the quality of submitted information.
- Review which questions or offers produce useful leads.
- Make sure new leads reach the people or systems responsible for follow-up.
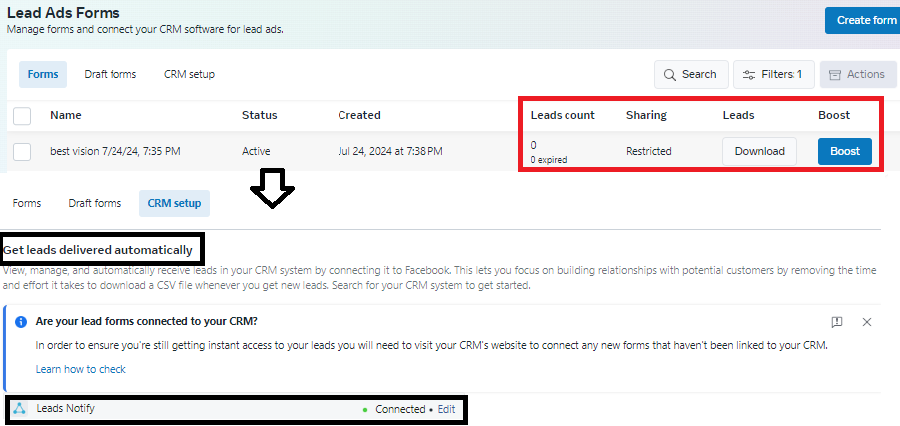
If you use a CRM or marketing platform, connect your lead workflow so new Facebook leads can be delivered automatically. LeadsNotify can help automate lead delivery and reduce the need to manually check and export new submissions.
Facebook Instant Form best practices
Creating a Facebook lead form is only the first step. The way you design and manage the form can have a significant impact on the quality of your leads.
- Keep the form short: Only ask for information you genuinely need.
- Match the form to the ad: Make sure the offer and messaging are consistent between the ad and Instant Form.
- Use clear questions: Avoid confusing or unnecessary questions.
- Explain what happens next: Tell prospects how and when they can expect a response.
- Test before launching: Submit a test lead and verify the complete workflow.
- Monitor lead quality: A high number of submissions does not necessarily mean a successful campaign.
- Connect your lead workflow: Send new leads to the appropriate CRM or marketing system so they can be followed up quickly.
Facebook Instant Form vs. landing page forms
Facebook Instant Forms and traditional website forms can both be used for lead generation, but they create different experiences.
- Facebook Instant Forms: Keep the lead-capture process inside Facebook or Instagram and can reduce friction by using pre-filled information.
- Landing page forms: Send prospects to your website, where you have more control over the page, content, branding, analytics, and conversion experience.
The right option depends on your campaign goals. Instant Forms can be particularly useful when you want a simple mobile-friendly lead capture experience directly from your ads.
How to manage Facebook Instant Form leads
Generating leads is only useful if those leads are followed up quickly. After someone submits a Facebook Instant Form, your business needs a reliable process for receiving, organizing, and contacting the new lead.
Manually exporting leads from Facebook and importing them into another system can create unnecessary work and increase the risk of delays. An automated connection can move new leads into your CRM, email marketing platform, or other supported destination.
With LeadsNotify, businesses can automate the delivery of supported Facebook leads to connected applications and reduce manual lead management.
Frequently asked questions about Facebook Instant Forms
What is a Facebook Instant Form?
A Facebook Instant Form is a lead-generation form that allows people to submit their contact information directly from a Facebook or Instagram ad without necessarily visiting an external website.
How do I create an Instant Form on Facebook?
Open Meta Ads Manager, create or select a lead-generation campaign, choose Instant Form as the lead capture method, and configure the form’s introduction, questions, privacy information, and completion screen. Test the form before publishing it.
What is the difference between More Volume and Higher Intent forms?
More Volume is designed to make the submission process quicker, while Higher Intent adds a review step that gives users an opportunity to confirm their information before submitting the form.
What size should a Facebook Instant Form background image be?
A commonly used Facebook Instant Form background image size is 1200 × 628 pixels. Always check the current specifications shown in your Meta account because platform requirements can change.
Can I test a Facebook Instant Form before launching it?
Yes. Testing the form before launching your campaign allows you to check the questions, required fields, privacy information, completion screen, and overall submission experience.
Can I edit a Facebook Instant Form after publishing?
Form editing options can depend on the current Meta interface and the form’s status. Review the form carefully before publishing and create a new version when Meta does not allow the changes you need.
Where do Facebook Instant Form leads go?
Lead submissions can be accessed through Meta’s lead-management tools and can also be connected to supported CRM and marketing platforms. The exact destination depends on how your lead workflow is configured.
Create and manage Facebook leads more efficiently
Facebook Instant Forms provide a convenient way to capture contact information directly from Facebook and Instagram advertising campaigns. By keeping the submission process simple, using relevant questions, and clearly explaining what happens next, you can create a better lead-generation experience.
The most important steps are to choose the right form type, create a focused introduction, collect only the information you need, add your privacy policy, configure the completion screen, and test the form before launching your campaign.
Once your Facebook Instant Forms start generating leads, make sure those leads reach your sales or marketing workflow quickly. Automating lead delivery with a tool such as LeadsNotify can help reduce manual exports and make it easier to act on new Facebook leads.
Ready to automate your Facebook leads? Sign up for LeadsNotify and connect your lead-generation workflow.
Set up a free notification in a few minutes.

Abdullah Khan
A Technical Lead and backend architect with 10+ years of experience building reliable, high-scale APIs and automation systems. At LeadsNotify, he helps build and maintain the integrations that route Facebook and LinkedIn leads to email, CRMs, and marketing tools in real time.
Connect on LinkedIn ↗